Common Mistakes to Avoid When Growing Orchids in Your Garden

Orchids are renowned for their exquisite beauty and unique charm, making them a favorite among gardeners worldwide. While these elegant plants can thrive in various environments, they also require specific care and attention to reach their full potential. Unfortunately, many enthusiasts inadvertently make mistakes that hinder the growth and health of their orchids. In this guide, we’ll explore some of the most common mistakes to avoid when cultivating orchids in your garden, along with practical tips to help you nurture these delicate blooms with success.
Overwatering

One of the most frequent mistakes novice orchid growers make is overwatering their plants. Orchids are epiphytes, meaning they naturally grow on other plants in their native habitats and have adapted to survive with minimal water. Overwatering can lead to root rot and other fungal diseases. Instead, water your orchids sparingly, allowing the potting medium to dry out slightly between waterings. A good rule of thumb is to water your orchids when the top inch of the potting mix feels dry to the touch.

Improper Drainage

Inadequate drainage is another common pitfall when growing orchids. Orchid roots require good airflow to prevent rot, so it’s essential to use a well-draining potting mix specifically formulated for orchids. Avoid using standard potting soil, as it retains too much moisture and can suffocate the roots. Additionally, ensure that your orchid pots have drainage holes to allow excess water to escape freely.

Inadequate Light

Orchids thrive in bright, indirect light, but too much direct sunlight can scorch their delicate leaves. Conversely, insufficient light can result in weak growth and a lack of blooms. Find a balance by placing your orchids in a location where they receive filtered sunlight or dappled shade for several hours each day. East or west-facing windows are often ideal for providing the right amount of light without the risk of sunburn.

Incorrect Temperature and Humidity

Orchids are sensitive to temperature fluctuations and humidity levels. While specific requirements vary depending on the orchid species, most prefer temperatures between 60°F and 80°F during the day and slightly cooler temperatures at night. Additionally, orchids thrive in environments with moderate to high humidity, mimicking their natural habitats in tropical regions. To increase humidity, consider using a humidity tray, a small humidifier, or grouping your orchids together.

Ignoring Air Circulation

Adequate air circulation is crucial for preventing fungal diseases and promoting healthy growth in orchids. Avoid placing your orchids in stagnant or poorly ventilated areas, such as closed terrariums or crowded shelves. Instead, provide ample space between plants to allow air to circulate freely around them. You can also use a small fan set on low to improve air circulation in your growing area.

Skipping Repotting

Orchids should be repotted periodically to refresh their potting medium, prevent overcrowding, and promote healthy root growth. Neglecting to repot your orchids can lead to compacted potting mix, which inhibits drainage and restricts root development. Repot your orchids every one to two years, or when you notice roots growing over the edge of the pot or bursting through the drainage holes.

Overcrowding

While it may be tempting to display multiple orchids together for a stunning floral arrangement, overcrowding can lead to competition for resources and increased risk of disease spread. Give each orchid plenty of space to grow by placing them in separate pots or hanging baskets. This not only allows for better airflow and light penetration but also makes it easier to monitor and care for individual plants.

Ignoring Signs of Stress or Disease

Orchids are excellent indicators of their overall health, and it’s essential to pay attention to any signs of stress or disease. Common indicators of problems include yellowing or drooping leaves, wilting flowers, moldy potting mix, or pest infestations. Address issues promptly by identifying the underlying cause and taking appropriate action, whether it’s adjusting watering habits, repotting, or treating for pests and diseases.

Overfertilizing

While orchids do benefit from occasional fertilization, overdoing it can do more harm than good. Excessive fertilizer can build up in the potting medium, leading to salt accumulation and root burn. Follow the manufacturer’s instructions for diluting and applying fertilizer, and only fertilize your orchids during their active growing season. A balanced orchid fertilizer, such as a 20-20-20 or 10-10-10 formula, applied at half strength every four to six weeks, is generally sufficient to meet their nutritional needs.

Inconsistent Care

Consistency is key when it comes to caring for orchids. Erratic watering, sudden changes in light or temperature, or neglecting routine maintenance tasks can stress your plants and compromise their overall health. Establish a regular care routine based on your orchids’ specific needs, and make adjustments gradually to avoid shocking or stressing them.

By avoiding these common mistakes and implementing proper care practices, you can enjoy healthy, thriving orchids in your garden for years to come. Remember that every orchid is unique, so don’t be afraid to experiment and learn from your experiences as you nurture these captivating plants. With patience, attention to detail, and a little bit of trial and error, you’ll soon become a confident orchid enthusiast.

Common Mistakes to Avoid When Growing Orchids in Your Garden Read More »

Techniques for Combining Different Orchid Species in Your Garden

Orchids, with their diverse forms, colors, and fragrances, offer an endless canvas for creativity in garden design. While each orchid species possesses its own unique charm, combining different species can elevate your garden to new heights of beauty and intrigue. However, achieving successful fusion requires careful planning and execution. In this guide, we’ll explore techniques for seamlessly integrating different orchid species in your garden, creating harmonious displays that delight the senses and captivate the imagination.

Understanding Orchid Compatibility

Before embarking on your orchid fusion journey, it’s crucial to understand the compatibility of different orchid species. Some orchids naturally thrive together, sharing similar environmental requirements and growth habits, while others may compete for resources or inhibit each other’s growth. Researching the specific needs and behaviors of each orchid species is essential for selecting compatible combinations.

Layering and Vertical Gardens

One effective technique for combining different orchid species is through layering and vertical gardening. Utilize various levels within your garden space, such as hanging baskets, trellises, or wall-mounted containers, to create vertical layers of orchids. This approach not only maximizes space but also allows for unique interactions between different species, with cascading blooms creating stunning visual displays.

Creating Microclimates

Orchids originate from diverse ecosystems around the world, each with its own unique climate conditions. To accommodate the specific needs of different orchid species, consider creating microclimates within your garden. Utilize shading, misting systems, and strategically placed rocks or other structures to regulate temperature, humidity, and light levels, providing optimal growing conditions for each orchid variety.

Companion Planting

Companion planting involves pairing orchids with other plant species that complement and support their growth. Choose companion plants with similar cultural requirements and growth habits to create cohesive and visually appealing arrangements. Additionally, select plants that bloom at different times of the year to ensure continuous color and interest in your garden.

Orchid Communities

Create communities or clusters of orchids within your garden, grouping together species that naturally grow in close proximity in their native habitats. Mimicking natural ecosystems fosters symbiotic relationships between orchid species, promoting mutual support and enhancing overall garden health. Experiment with different combinations to discover harmonious groupings that thrive together.

Interplanting and Underplanting

Interplanting involves strategically placing different orchid species within the same planting bed or container, allowing them to coexist and interact with one another. Consider factors such as growth habit, bloom time, and color palette when selecting combinations for interplanting. Underplanting involves adding smaller orchid species beneath taller varieties, creating layers of texture and interest within your garden beds.

Hybridization and Crossbreeding

For those seeking to push the boundaries of orchid diversity, hybridization and crossbreeding offer endless possibilities for creating new and unique orchid varieties. Experiment with controlled pollination techniques to combine desirable traits from different orchid species, resulting in hybrid offspring with novel characteristics. While hybridization requires patience and expertise, the rewards of creating your own orchid hybrids are truly satisfying.

Seasonal Rotation

To maintain a dynamic and ever-changing garden display, consider implementing seasonal rotation strategies. Swap out orchid species as they finish blooming, replacing them with varieties that are just coming into flower. By carefully planning your plantings, you can ensure a continuous cycle of color and interest throughout the year, keeping your garden vibrant and engaging.

Maintenance and Monitoring

Regular maintenance and monitoring are essential for the success of your orchid fusion garden. Keep a close eye on the health and growth of each orchid species, adjusting care practices as needed to accommodate changing conditions. Prune spent blooms, remove dead or diseased foliage, and provide supplemental fertilization and water as required to keep your orchids thriving.

In conclusion, combining different orchid species in your garden opens up a world of creative possibilities, allowing you to design unique and captivating displays that showcase the beauty and diversity of these remarkable plants. By employing techniques such as layering, companion planting, and hybridization, you can create harmonious orchid communities that flourish and evolve over time. With careful planning, experimentation, and attention to detail, your orchid fusion garden will become a source of endless inspiration and delight for years to come.

Techniques for Combining Different Orchid Species in Your Garden Read More »

The Benefits and Impact of Gardening on Stress Reduction in Urban Areas

Understanding the Impact of Stress on Urban Dwellers

Urban areas are known for their fast-paced lifestyles, high levels of noise, traffic congestion, and constant demands. The hustle and bustle of city life can take a toll on our mental and physical well-being, leading to increased stress levels. Stress has become a common part of our daily lives, and finding ways to alleviate it has become more important than ever.

The Benefits of Gardening for Stress Reduction

Gardening, with its connection to nature and hands-on activities, has been found to have numerous benefits in reducing stress levels, particularly in urban areas.

One of the key benefits of gardening is its ability to provide a sense of purpose and accomplishment. The act of planting seeds, nurturing plants, and watching them grow can be incredibly fulfilling. This sense of achievement can boost our mood and self-esteem, helping to reduce stress levels.

Furthermore, gardening can act as a form of physical exercise, which is known to release endorphins and reduce stress. Digging, weeding, watering, and other gardening tasks can provide a full-body workout, helping to relieve tension and promote relaxation. The physical exertion also helps to improve sleep quality, another important factor in stress reduction.

Physical Health Benefits of Gardening

In addition to its mental health benefits, gardening also has significant physical health benefits. Engaging in gardening activities can help to improve cardiovascular health, increase stamina, and strengthen muscles. The physical exertion involved in gardening, such as digging, planting, and carrying heavy pots, can be a great form of exercise.

Tips for Starting a Garden in an Urban Area

Even in the limited space of an urban area, gardening is still possible. Here are some practical tips for starting a garden in an urban environment:

  1. Choose the right plants: Opt for plants that are suitable for small spaces, such as herbs, succulents, or dwarf varieties of vegetables and fruits. Consider the amount of sunlight your chosen space receives and select plants accordingly.
  2. Utilize vertical space: Make use of walls, fences, and balconies by installing vertical gardens or hanging planters. This maximizes space and allows for more plants to be grown.
  3. Use containers: Grow plants in pots, containers, or raised beds to make the most of limited space. This allows for flexibility in moving the plants around and can be particularly useful for those with limited outdoor space.
  4. Consider indoor gardening: If outdoor space is limited, consider indoor gardening using windowsills, shelves, or even hydroponic systems. This allows for year-round gardening and can be a great way to bring nature indoors.
  5. Practice sustainable gardening: Implement eco-friendly practices such as composting, water conservation, and using organic fertilizers. This not only benefits the environment but can also enhance the overall gardening experience.

Urban Gardening Techniques and Ideas

Urban gardening offers a range of techniques and ideas to maximize limited space and create a vibrant green oasis. Here are some popular urban gardening techniques and ideas:

  • Container gardening: Grow plants in containers such as pots, buckets, or even recycled items like old tires or plastic bottles. This allows for mobility and flexibility in creating a garden in small spaces.
  • Vertical gardening: Utilize walls, fences, or trellises to grow plants vertically. This technique maximizes space and can create a stunning visual display.
  • Rooftop gardening: Make use of rooftops to create gardens, either through container gardening or installing rooftop greenhouses. Rooftop gardens not only provide a peaceful retreat but can also help with insulation and reduce energy consumption.
  • Community gardening: Join or start a community garden in your neighborhood. Community gardens provide a sense of camaraderie and allow for shared resources, knowledge, and experiences.

It’s Never Too Late to Start Gardening as Your Stress-Relieving Activity in Urban Areas

Gardening presents a plethora of benefits for stress reduction in urban environments. It goes beyond just providing a sense of purpose and fostering creativity; it has a profound positive impact on both mental and physical health. In the hustle and bustle of our fast-paced lives, gardening emerges as a powerful tool to combat stress.

The Benefits and Impact of Gardening on Stress Reduction in Urban Areas Read More »

Top Tips For Tree Lopping in Your Orchid Garden

If you’re planning to plant an orchid tree in your garden, there are some essential insights you must know. One of those is how to keep your plants healthy, particularly the trees, and apply proper maintenance like tree lopping.

It’s important to choose the right tree. Ideally, you want a tree with rough bark that is groovy, giving the roots a good grip on it.

tree loping

1. Choose Your Tree Wisely

Orchid trees are some of the most interesting and versatile landscape plants. Their bright green leaves, colorful blooms, and sweet-smelling flowers add color to your yard and make them a unique addition to any garden.

They can also be a great centerpiece for your outdoor space and are easy to care for, making them a popular choice among homeowners. But, as with any plant, they need some help to thrive and look their best.

To keep your orchid tree happy, choose a location that provides enough light to encourage growth but not too much. Direct sunlight can burn an orchid and lead to wilted leaves or no blooms.

Choose a tree with a thick, horizontal trunk or branch that is thick enough to support the roots of your orchid. You want a tree that has bark with good texture, or what is commonly called “groovy” bark.

2. Don’t Be Afraid to do tree lopping

Whether you have a Phalaenopsis orchid, a Cattleya, or another type of tree, tree loping is essential for maintaining the health and vitality of your plant. Not only can you encourage the plant to grow bigger roots and blooms, but pruning helps prevent disease and fungus.

It is also an opportunity to remove any dead or dying roots. This can make the process of repotting less stressful for your orchid.

You can prune your tree while it is still in the flowering stage, or at any time of the year. Regardless of which method you choose, be sure to use sharp scissors and don’t cut the plant too aggressively. However, it is advisable to contact a certified arborist to ensure trees will be properly lopped.

Most types of orchids produce spikes as a flower structure, and once the plant has finished blooming, it needs to be trimmed back. This will encourage new flower spikes to appear in the future.

3. Make Sure Your Tree Gets Plenty of Sun

The sun plays a big role in the photosynthesis process that trees use to synthesize food from carbon dioxide and water. Without enough sun, your tree can be weakened and even killed.

As a result, it’s important to choose the right spot when planting your tree. For example, most fruit trees need full sun (at least 6 hours of sunlight a day) to produce fruits.

To get the best results, be sure to plan your tree’s location well in advance. Consider the direction of your home’s windows and where the sun will be during the day.

Once you’ve chosen the perfect spot, be sure to keep an eye on your tree’s progress in the first few months of its life. If it’s doing well, you can gradually increase the amount of sunlight it receives in small increments until it’s fully acclimated to its new location. This will give it the best chance to thrive and provide you with many years of beautiful orchids!

4. Don’t Be Afraid to Water

Many orchids are epiphytes, which means that they cling to tree branches rather than delving into the soil. This makes them ideal houseplants.

These plants are also hardy and do well in warm, stable climates – even in the deep south and coastal areas. However, some orchids require specific conditions to thrive, so it’s important to choose the right one for your garden and your space.

If you want to keep your plant happy when it is being removed from the orchid garden, it’s important to water it regularly. Different cultivars require different watering requirements, so be sure to research the proper care for your particular orchid to make sure you’re providing it with plenty of moisture.

Top Tips For Tree Lopping in Your Orchid Garden Read More »

Why Are My Orchid Leaves Turning Yellow?

Too much sun

orchid leaves turning yellow

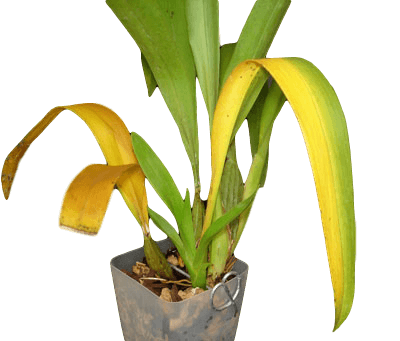
The main cause of orchid leaves turning yellow is overwatering. This is not a good thing because it kills the plant from the roots up. Before you even realize that your orchid has become sick, the roots start to rot and turn black. The best way to save your plant from this condition is to place it in a well-ventilated area. This will allow the orchid more air flow and avoid bacterial or fungal infections.

Another common cause of orchid leaves turning yellow is a nutrient deficiency. After the plant absorbs all of the nutrients from the potting mix, it may need fertilizer. Buy a fertilizer that is formulated for orchids, and make sure to follow the instructions on the label. Because orchids are light feeders, they do not require as much fertilizer as many other plants, but they can benefit from regular fertilization.

Too much sunlight can also cause orchid leaves to turn yellow. If you are growing your orchid in direct sunlight, the bright light from the sun can burn the leaves, causing them to turn yellow or brown. It will also cause scorch marks and cracks on the leaves. It may be necessary to move your orchid to indirect sunlight for a few hours each day.

Too little water

If you want to keep orchids looking their best year-round, make sure you don’t overwater them. While orchids need a stable temperature, too much or too little water can damage the leaves and stunt growth. However, the good news is that yellowed leaves can be easily replaced with new ones, so you don’t need to worry about having to remove them. Just make sure that your orchid’s room has a thermostat that keeps the temperature from dropping below 60 degrees F, and that it’s away from any cold drafts. Fertilising your orchid is also important to ensure that it’s healthy, but be careful not to over-fertilize it.

If you do notice that your orchids’ leaves have turned yellow or black, it might be time to increase their water levels. You can do this by adding a few drops of water each time you water. Make sure that the watering level matches the type of orchid that you have.

Nutritional deficiency

Orchids can show signs of nutrient deficiency if they do not receive enough calcium and magnesium in their soil. The plants can also have brown or black leaf tips. If this is the case, you should take steps to fix the problem as quickly as possible. You can start by feeding the plant with Cal Mag solution. Apply it once a week for three weeks. After that, you can observe improvements in the leaves. Moreover, if you see that the calcium and magnesium levels are lower than normal, you may have to give them additional feedings to make them healthy.

Orchids can suffer from different kinds of diseases, including fungus and virus. These conditions are hard to detect and treat. The main symptoms of these diseases are different and may be confused with one another.

Pests or disease

If you notice the leaves of your orchids turning yellow, you must immediately identify the cause. A common culprit is a fungal or bacterial infection. A fungal infection will cause the leaves to turn yellow, and bacterial rot will cause the leaves to turn black. Fortunately, you can prevent the problem from spreading by using the proper treatment.

The first thing you must do is check your orchid’s water source. Tap water can have high levels of magnesium and calcium, which are harmful to orchids. The high levels of these minerals can cause the leaves to turn yellow. In addition, hard water can also be harmful to the plant’s ability to absorb micronutrients.

In addition to pests, other common orchid problems include bacterial and fungal diseases. Fungal diseases are typically caused by overwatering. To prevent bacterial infections, you must remove infected leaves before they wilt. You can also apply a fungicide if you suspect a bacterial infection.

Why Are My Orchid Leaves Turning Yellow? Read More »

Orchid Fertilizing Tips

Before you fertilize your orchids, it is important to follow the directions of the orchid fertilizer on the package. The manufacturer will usually tell you to mix one teaspoon of fertilizer per gallon of water. You can, however, cut this amount in half or a quarter. Instead, mix one-half to one-fourth of the fertilizer with each watering. Make sure to rinse the plants after each fertilizing to prevent any salt buildup.

orchid Fertilizer Dosage

The correct orchid fertilizer dosage will ensure the optimum growth of your plants. Many orchid fertilizers are made from fish protein, soy protein, hydrolyzed poultry, bone meal, and kelp extract. These plant nutrients contain potash, calcium, and other essential nutrients. The best way to use these products is to follow the instructions on the package. It is also important to remember that the fertilizer you choose should be sized to match the size of the pot in which you’re growing the plant.

The recommended dosage for orchid fertilizer varies from product to product. In general, the manufacturer’s instructions suggest adding one teaspoon per gallon of water. However, if you’re unsure about the exact dosage for your orchid, use half to a quarter of the recommended amount. Remember to rinse the plant thoroughly after every watering, as salt can build up on the leaves of your orchids.

orchid fertilizer

Mixing Your Orchid fertilizer

Using orchid fertilizer is a convenient, low-cost way to provide your orchid with the nutrients they need to thrive. It also helps to promote new growth and colorful blooms. Unlike regular fertilizer, orchid fertilizer expires after two months, making it an ideal solution for people who don’t have the time or the inclination to feed their plants regularly.

When you mix fertilizer for orchids, be sure to use a well-balanced blend. A high-quality, balanced formula is equally as effective at producing blooms as boosters. It also benefits all plants. There is an entire industry devoted to the sale of orchid food, but it’s important to avoid being overwhelmed by marketing hype. Despite the claims of the various brands, one nitrogen molecule is nearly identical to another.

Avoiding urea

Fertilizing your orchids is an important part of keeping them healthy. Most orchids need higher levels of nitrogen than other household plants. This is because their potting medium is usually made from tree bark, which contains bacteria that feed off nitrogen fertilizer. Avoid overfertilizing orchids by following the manufacturer’s instructions for fertilization.

Fertilizing orchids during the winter months can help them withstand cold weather and keep blooming longer. A winter fertilizer with a lower nitrogen content and a higher potassium content is ideal. During the winter season, you can also use less frequent fertilization to promote a healthy orchid.

If you’d like to use fertilizer on your orchids, make sure to look for one that doesn’t contain urea. Many commercial fertilizers have varying amounts of urea and other nitrogen-containing chemicals. Non-urea fertilizers should be half-strength and mixed with water before applying.

Mixing with rainwater or reverse osmosis (RO) water

Mixing with rainwater or reverse odized water for orchid fertilization is a good way to get a balanced mix of nutrients for your plants. The key is to avoid adding too much nitrogen, which can be bad for the roots. Fortunately, urea is easily broken down into ammonium, which orchid roots can easily absorb. Reverse osmosis water is also free of dissolved solids, which make it ideal for orchid fertilization.

It’s best to purchase orchid fertilizer specifically labeled for this purpose. Ideally, the product will have a balance of three major elements – carbon, phosphorus, and nitrogen – in its composition. The label should also give the percentage of each element.

Orchid Fertilizing Tips Read More »